URLs are like fine stemware, one slip or crack and they’ll break right in your hands. Migrating your URLs to a new domain or web host requires a little TLC. Unfortunately, many companies underestimate the size and scope of the project that lies ahead of them.
Aside from the design considerations of carrying over themes and redesigning fonts and styles on a new website, SEO specialists have a major responsibility to ensure that traffic is not lost during or after the transition.
While most site migrations don’t require a top-down rebuild, most come with a host of technical fixes and changes require very thorough examination and understanding.
In this guide, we’ll explain everything you need to know in order to undergo a site migration onto any new platform. Join us as we explore every tireless detail that must be addressed to undergo a site migration of any size, scope, or scale.
Determining Site Migration Objectives
There are many reasons webmasters undergo a site migration and each objective will require an additional set of technical considerations. For the most part, the most common reason webmasters migrate their website are to:
- Rebrand their domain
- Switch their URL structure from HTTP to HTTPS
- Move to a new CMS or Web Builder
- Change web hosting services
- Migrate URLs to an international friendly page
A site migration may even operate as a hybrid migration, or a combination of different strategies, such as switching top level domains, as well as web hosting services in one project.
Depending on the scope of the project, you should be able to budget accordingly and determine a timeframe that matches up with business objectives.
Site Migration Considerations
Depending on what type of migration your site is completing, there are important considerations that will warrant extra attention for your SEO team. For example, migrating to HTTPS will require traffic will need to be redirected using the HSTS protocol.
Generally, we advise businesses to migrate during a slow period, such as Q1 or Q2 of the new year. This way any changes in traffic won’t be as disruptive as say the holiday season or an important sales event.
We suggest giving your timeline some breathing room in case you incur any hiccups along the way.
Once complete, it’s important to create performance benchmarks to monitor how successful your migration is in reaching your online objectives as a business. This can be quantified by monitoring trends in traffic and conversions after the website launch, or in creative by implementing usability tests and putting the new site in the hands of users.
Enterprise Site Migration: Extra Considerations
Enterprise companies face an even larger challenge when it comes to migrating over a website. An enterprise website is considered a website with over one thousand or more web pages. At that scale, the high volume or pages can be a hindrance on crawl budget and the manual work it takes to redirect old URLs to a new website.
Additional challenges include:
- Maintaining topical focus and thematic continuity throughout the new website
- Structuring website URLs to reflect new hierarchical structures
- Deciding which content should be carried over and repurposed at scale
- Redirecting social and outbound channels to point to the new master domain
- Consolidating multiple business locations and subdomains to point to their new and respective URLs
The good news is that many of the technical aspects from an SEO perspective will remain intact. The bad news is that these can be quite difficult to maintain at scale. But that’s why site migrations can be so beneficial, especially for enterprise clients.
Larger websites tend to have more soft 404 errors and redirect chains. Preventing these issues is much harder than resolving them with a website migration.
For larger and more complicated websites, migrations can be a clean slate to do things and also a nightmare to figure out to accomplish successfully without sacrificing any traffic. In this next section, we’ll go over the technical considerations you need to consult before undergoing a site migration and then provide step-by-step instructions on how to complete a successful migration.
Technical SEO Checklist
Ensure your team can check off all of the below elements during the migration.
__ 301 redirects work
__ All internal links are functional
__ Internal links don’t link to mixed content
__ Custom 404s are in place
__ XML sitemap is created of all existing URLs
__ Robots.txt is updated
__ Schema is marked up on applicable pages
__ Meta Data is up to date
__ Images are properly sized, formatted, and compressed
__ Site is mobile responsive
__ Page speed is acceptable
__ HTML is validated
__ Canonical tags are properly transferred
__ Header tags are optimized
__ Hreflang tags are functional
Send this list to your developers so that both teams can align on SEO priorities through the migration process. This will help cut down on confusion on
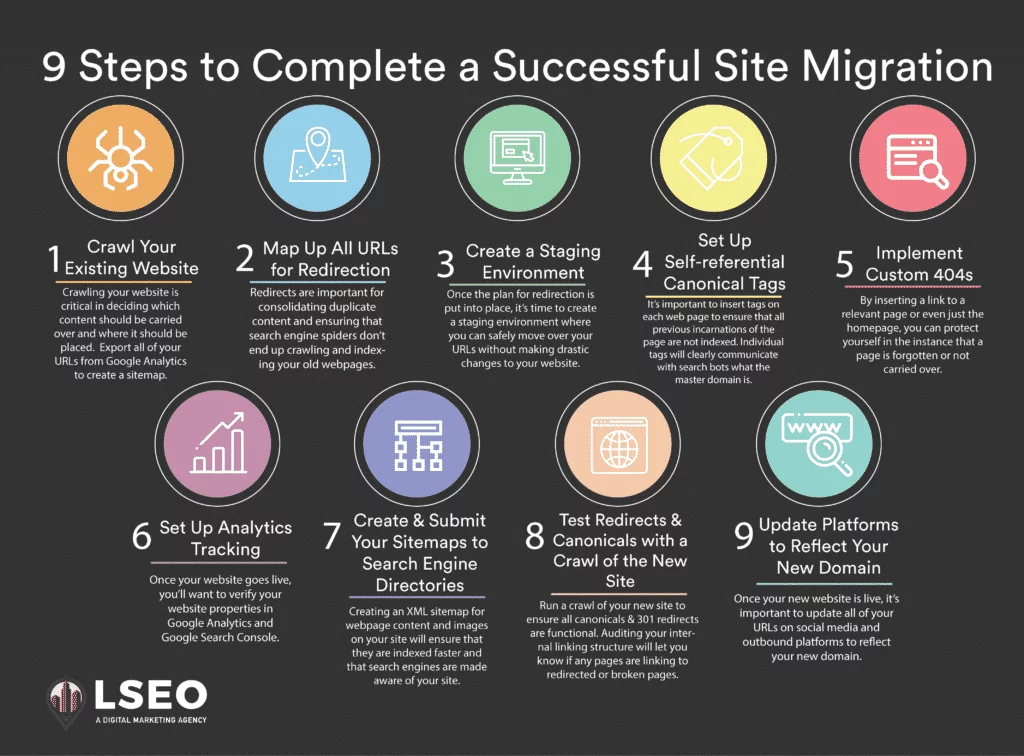
Steps to Complete a Successful Website Migration
1. Crawl your existing website
First, you’ll want to crawl your existing website to uncover all the URLs that are a part of your domain. What you’ll quickly discover is that a lot of pages on your website may be paginated and be unnecessary to carry over in your migration.
Crawling your website is critical in deciding which content should be carried over and where it should be placed.
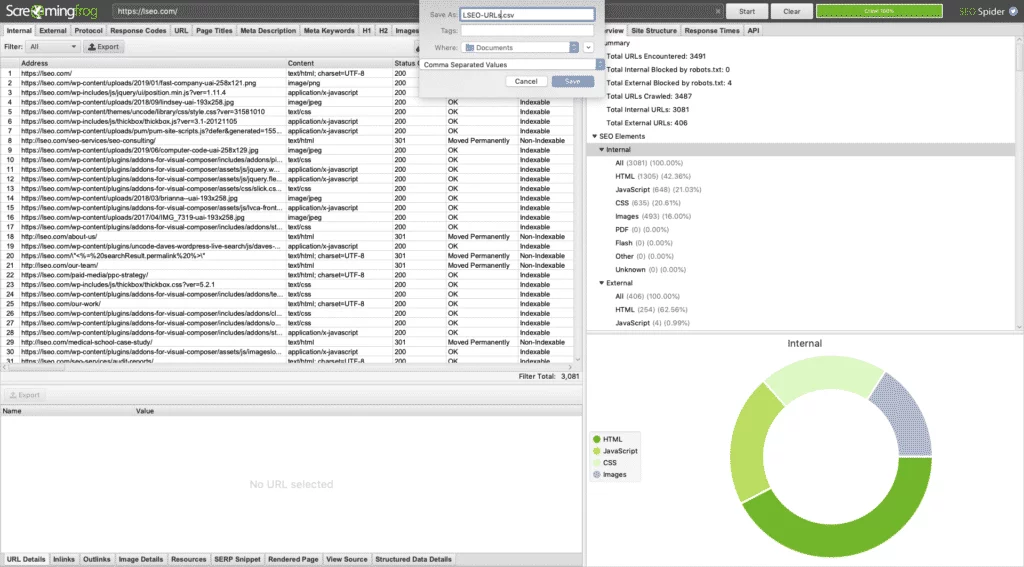
To start, export all of your URLs from Google Analytics to create a sitemap or run a crawl using Screaming Frog to extract all of the URLs on your website.
Once crawled, export the CSV file to a spreadsheet and create new tabs to separate what URLs should and should not be carried over.
 By adjusting the user agent to ignore the Robots.txt file you will get a comprehensive view of every page contained on your domain. Here, you can search for mistakes that need to resolved during the migration, such as:
- improper redirects
- long redirect chains
- 5xx errors
- pagination errors
- links to mixed content (e.g., HTTP pages, etc.)
This is generally good practice to start your website off with a clean slate and keep your traffic from bouncing or being redirected to the wrong location after the move.
2. Map up all URLs for redirection
Next, take your spreadsheet and evaluate which URLs you want to carry over and which ones you want to delete or redirect. There are a variety of tools available online to map out your redirects and organize your website files.
Redirects are important for consolidating duplicate content and ensuring that search engine spiders don’t end up crawling and indexing your old webpages.
For the most part, your CMS will provide native tools or plugins that allow you to map up redirects and visualize how the structure of your website will appear after migration. It’s important that all 302 redirects carried over in the migration are eventually moved to 301s or published live with the new site.
Additionally, it’s best practice not to redirect a webpage multiple times as this can slow download times as servers attempt to fetch the proper page.
3. Create a staging environment
Once the plan for redirection is put into place, it’s time to create a staging environment where you can safely move over your URLs without making drastic changes to your website.
You’ll need access to the backend of the website from your developer to make changes to meat data, headers, and other important elements. Leverage the robots.txt file to ensure your staging environment is not crawled by search engines during its development.
Using your redirect tool, you can begin bulk exporting each URL to your new platform. Depending on the type of migration needed, additional steps may need to be taken for redirection.
For example, if switching all traffic from HTTP to HTTPS pages, you’ll want to override the .htaccess file in your CMS and insert the following code:

4. Set up self-referential canonical tags
Once URLs have been redirected, it’s important to insert self-referential canonical tags on each web page to ensure that any and all previous incarnations of the page are not indexed. While your CMS will give you a sitewide canonical tag, implementing individual tags will clearly communicate with search bots what the master domain is.
5. Implement custom 404s
Even if you end up redirecting all broken URLs to a new page on your domain, it still helps to set up custom 404 pages in case the redirection doesn’t go 100% perfect. By inserting a link to a relevant page or even just the homepage, you can protect yourself in the instance that a page is forgotten or not carried over.

6. Set up Analytics tracking
Once your website goes live, you’ll want to verify your website properties in Google Analytics and Google Search Console. Furthermore, you’ll want to the install analytics tracking code on your website to monitor performance post-launch to evaluate how profitable your migration really was and track performance benchmarks.
7.Create and submit your sitemaps to search engine directories
Using Screaming Frog, you can crawl your website and then create a sitemap in the top menu.
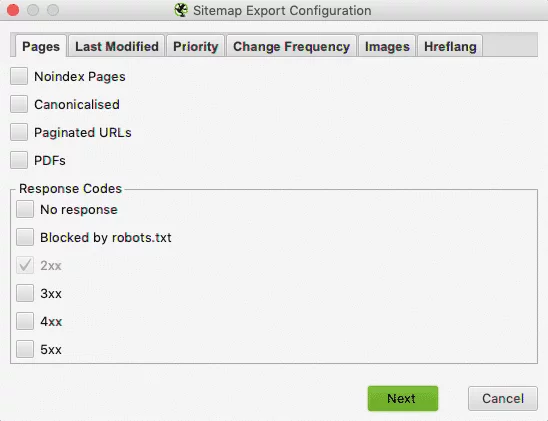
Once a sitemap has been generated, you will want to log into Google Search Console and Bing Webmaster Tools and submit your XML sitemap directly. Creating an XML sitemap for webpage content and images on your site will ensure that they are indexed faster and that search engines are made aware of your site.
8. Test redirects and canonicals with a crawl of the new site
Once all the pieces are put in place, it’s time to run a crawl of your new website. In fact, you can run a crawl of your staging site in Screaming Frog before any of the URLs are live by ignoring the robots.txt file. Simply paste in the staging environment URL and Screaming Frog will crawl it.
It’s important to run a crawl of your new site to ensure all canonicals and 301 redirects are functional. Additionally, auditing your internal linking structure with a crawl will let you know if any pages on your website are linking to redirected or broken pages.
9. Update platforms to reflect your new domain
Finally, once your new website is live, it’s important to update all of your URLs on social media and outbound platforms to reflect the new domain. Migrations also present a great opportunity to create some buzz for your brand on those channels that can provide a nice uptick in traffic upon launch.
Conclusion
Migrating your website will not always go perfectly, but you can cut down on errors by continually looking under the hood and crawling your website. The job of SEOs is to ensure that any hiccups are addressed and don’t result in a loss of traffic. If successful, the boost from having a faster or more responsive website can confer unlimited benefits for your brand and business.
Featured Image Credit: Pixabay
Screenshots: LSEO