If you’re serious about getting your pages to rank, you need to use Google Search Console. This powerful tool can provide insights to improve your rankings in no time.
However, if you want to see results, you need to know how to optimize GSC and use the data to make SEO optimizations. Especially for those who are new to SEO, the platform can seem intimidating and overwhelming. You may not know what any of the data is telling you.
Luckily, we’re here to help. Check out our ultimate guide to Google Search Console for everything you need to know.
What is Google Search Console?
How it differs from Google Analytics
Why you should use the platform
How to use Google Search Console
What Is Google Search Console?
Google Search Console is a tool for webmasters (people who manage websites) that provides true organic search insights into metrics like indexation, clicks, impressions, CTR, average position, and more.
For most of its lifespan, Google Search Console was known as Google Webmaster Tools. The platform didn’t get its new name until a 2015 rebranding. Three years later, a new update rolled out with significant changes.
From monitoring performance to detecting issues with your site, it has a wide range of capabilities. The ultimate purpose of the platform is for site owners to use the insights to set the site up better for search.
Our guide will teach you everything you need to know about GSC’s latest version. And, our comprehensive advice will help you optimize your account and get you on your way to improving your rankings.
Google Search Console vs. Google Analytics
To further answer the question “What is Google Search Console?” we must address what it is not — Google Analytics.
Even if you’re familiar with SEO, Google Search Console and Google Analytics might seem the same. They both provide website data.
However, these two tools have significant differences. So let’s take a closer look at Google Search Console vs. Google Analytics.
Google Search Console — Search Engine Focused
Google Search Console operates with search engines in mind. It provides data such as impressions, search queries, and click-through rates. It also focuses on errors, outbound links, and other metrics that don’t relate directly to your site’s visitors from other traffic sources.
Because of this search-engine-centric approach, Google Search Console is ideal for SEO professionals and web developers. It allows you to optimize your pages and improve their rankings. Most notably, it highlights issues and offers actionable recommendations.
Of course, simply installing it won’t improve your SEO, but as long as you know what to do with what it’s telling you, and you keep improving your site’s technical structure, you should start to see results.
Google Analytics — User Focused
Google Analytics, on the other hand, is more user-focused and collects data from all traffic sources.
It offers data that is relevant to your site’s visitors — examples include user behavior, audience demographics, time spent on-page, landing page performance, and more.
Both Google Search Console and Google Analytics are important to improve your SEO.
For instance, let’s consider the bounce rate. Google Analytics displays this metric to show you whether users take action when they visit one of your pages. Of course, if you’re a marketer, you want this percentage to be as low as possible. If customers always leave your pages prematurely, you’ll have difficulty maximizing sales, email sign-ups, and other conversions.
When you notice the bounce rate is less than ideal, you know that your pages aren’t as compelling as they could be. It might be a matter of making them more user-friendly or relevant to search queries. Or, there could even be a disconnect between the demographic of your visitors and the content on your pages.
Just like Google Search Console, you will have to be able to figure out what to do based on what the data is telling you. You will need to put your analyst hat on.
Google Search Console vs. Google Analytics — Which Should You Choose?
Now that you know the difference between Google Search Console and Google Analytics, you might be wondering which you should use.
On the surface, the answer seems simple. It’s both!
SEO professionals and web developers need Google Search Console because of its search engine focus. The user-centric nature of Google Analytics, on the other hand, also makes it appropriate for all digital marketers with user-experience becoming a bigger part of SEO.
Anyone who wants to improve their website can use these platforms in tandem to achieve their goals.
For instance, let’s circle back to the Google Analytics metric we discussed earlier — bounce rate. This percentage can tell you that you need to make changes to get users to take action. Even though it doesn’t tell you what changes to make, you can fill in the blanks with none other than Google Search Console.
One metric on GSC that may be particularly useful? Search queries. By seeing what Google Search Console keywords visitors are using to get to your pages, you can determine if the content you have is relevant to their queries and what information they are seeking.
If not, you can experiment with changes that will foster user action. These changes can be as simple as making your CTA button more noticeable or using language more relevant to your audience.
Note that when you address bounce rate, user experience isn’t the only thing you’re improving. Lower bounce rates often translate to higher rankings because users will be more engaged with your pages and Google will reward that.
At the end of the day, when it comes to Google Search Console vs. Google Analytics, remember that one isn’t necessarily better than the other. Each is powerful on its own, and when you use them together, they will help you improve your website as a whole.
Pro tip: You can even integrate your Google Search Console into your Google Analytics account. This move lets you see all of your site’s most important data all in one place.
Why You Should Use Google Search Console
GSC isn’t too complex, but it can take some time to get used to. Once you are familiar with the interface, navigating the tool will be a breeze.
Here are some of the key benefits of Google Search Console:
1. It Helps You Track Your Content Marketing Efforts
You’ve heard it before, but it’s worth rehashing — in the SEO world, content is king.
Content is why users even bother coming to your web pages. It offers value, whether it be in the form of information, entertainment, or even shopping products. Perhaps more importantly, it shows search engines that your pages are worth ranking.
If you’re already hip to the notion that content is important, you probably have extensive content marketing campaigns. If not, you should get one.
Content marketing can include everything from videos and webinars to e-books and product optimizations. Content doesn’t have to be a long-form piece like this guide. It could be as simple as a product page optimization
You want to ensure you’re making the most of your efforts. That’s where GSC comes in!
Content Keyword Reports
The platform has a “content keyword” report that shows you which terms web crawlers find on your site. Essentially, these Google Search Console keywords show you how Google “reads” your site.
If the Google Search Console keywords line up with your own list of keywords, you’re on the right track. It means that people who click on your pages are interested in your content and users are finding you through what you want to be found on.
In some cases you might find irrelevant keywords in the report. The disconnect could be a sign that your content needs some work.
For instance, if you are ranking for keywords that you don’t want to rank for, you might consider decreasing the density of those terms.
Conversely, you can increase the density of keywords that aren’t performing as well. Seeing which words you need to incorporate throughout your pages can help you develop fresh content.
2. It Provides Insight Into SEO Performance
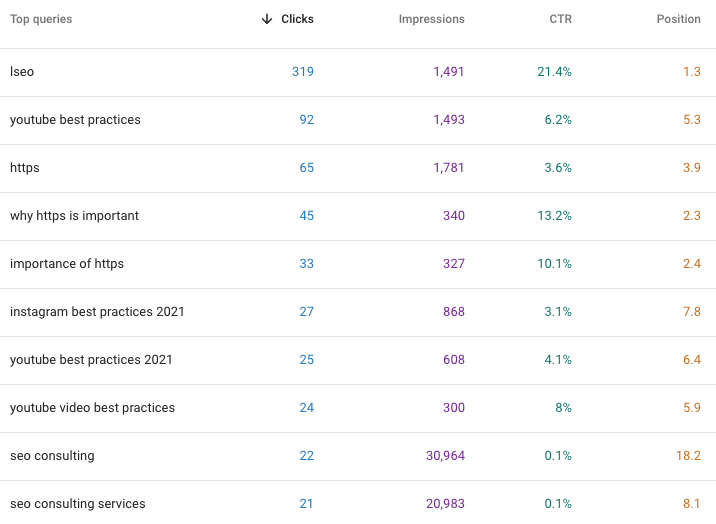
Previously known as Search Queries, Search Analytics is one of the most popular sections within GSC. It offers a wealth of information you can use to check your SEO performance.
At the top, you can sort through the data via helpful filters for clicks, impressions, CTR, and average position. You can even view information specific to queries, pages, countries, search type, and dates.
A good way to start is filtering for queries by impressions. When you understand which terms get the most visibility, you can further analyze the data for these pages.
For terms with a lot of impressions, you should consider first if the keyword is valuable, and then determine if it’s getting as many clicks as it should be based on the impressions.
Then you can start getting into more strategic brainstorming sessions to take further action.
3. It Helps You Optimize Mobile Compatibility
In the Search Analytics section, you can also filter by mobile devices. This information helps you analyze the performance of mobile users, which is where most of your traffic is coming from.
To optimize mobile compatibility further, you can check out the mobile usability report. It highlights issues such as the font size being too small or touch elements being too close together.
Fixing these issues is important because you can’t get by without an optimized mobile site in this day and age. In 2020, there were 211 million mobile searches in the U.S. alone.
Note that having an optimized mobile site is also crucial for SEO. Back in 2013, Google announced that a poorly optimized mobile site could lead to poor rankings. Not surprisingly, this trend is even more prominent today.
4. It Helps Google Index Your Site
When you publish your site, it’s totally feasible to sit back and let Google find it on its own. The crawlers will index your pages — eventually.
You shouldn’t wait around though. Instead, you want to help the crawlers find your pages faster.
There’s no better way to do this than through GSC. As we’ll discuss later, you can complete the Google Search Console sitemap submission to speed the process along.
GSC can also help you index by helping you identify crawl errors and displaying crawl stats. There may be actionable insight out of this.
5. You Can Hire Professional Help
Want to reap all the benefits of GSC without having to learn the platform? Our Google Search Console SEO experts can help!
We will set up your account, helping you cover all of your bases from the start. Just as important, we monitor your performance and make the appropriate changes as needed.
Our professional services handle the heavy-lifting of GSC and let you focus on running your business. Get started by contacting us today!
How to Set Up Google Search Console
Once you realize how powerful this web service is, you’re probably eager to get started. Here’s a step-by-step walkthrough on how to set up Google Search Console.
1. Sign In to Google Search Console
Start by going to the Search Console website. It will prompt you to sign in with your Google account.
You can use any Google account you already have, but it will make your life much easier if you use the account linked to your Google Analytics (you’ll see why later).
2. Complete Google Search Console Verification
Once you sign in, you’ll need to tell the platform which website you want it to track.
In the upper left corner of the page, there is an “Add Property” button. Click on it to open the “Select property type” dialogue box.
The two property types are “Domain” and “URL prefix.” So, how do you know which one to pick?
Adding your site as a domain property allows you to track an entire site, from your main domain to all of its subdomains if you have any.
Adding your website as a URL prefix will only track data for the pages on the domain you enter. This route will give you more options for verification and is often easier to get verified.
Google Search Console verification can take many forms. Some SEOs choose to upload a unique HTML file or code snippet into the header of their site, while others may add a special TXT record to their domain settings.
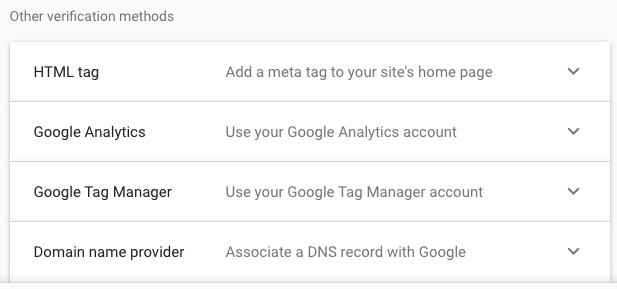
The easiest method for verification is if you already have your Google Analytics set up through the same Google account. All you have to do is click the verify button under this method and voilà.
Why Google Search Console Verification Is Important
Are you wondering why the platform requires verification? It’s for your own good. Plus without verification, you won’t be able to see or use the data.
Google Search Console verification ensures you’re the only one with access to your site’s sensitive data. It also prevents others from affecting your performance in search engines.
3. Submit an XML Sitemap
After Google Search Console verification, the next step is to submit your XML sitemap.
We know that the term “XML sitemap” can sound technical, confusing, and scary. But it’s a simple and effective way for your site’s pages to be crawled and indexed.
When search engines have your XML sitemap, it is easier for them to crawl and index your pages based on a level of priority. As a result, you significantly improve your page’s chances of ranking.
To Sitemap or Not to Sitemap
An XML sitemap is especially important if you have an eCommerce website with thousands of pages.
However, we recommend submitting one even if your website only has a handful of pages. You want to improve your odds of ranking in every way possible.
Now just having a sitemap isn’t going to instantly gain you rankings, but we are simply talking about giving yourself the chance to rank. The pages will still need to be optimized through important on-page areas for keywords.
Still not convinced? Google Search Console sitemap submission is as quick and easy as it gets, meaning you have nothing to lose. See below for an overview of the process.
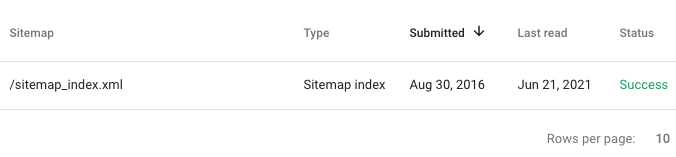
Google Search Console Sitemap Submission
Before you create a sitemap to submit, see if you already have one. You can check by going to http://yourdomain.com/sitemap.xml.
If nothing comes up, you’ll have to create one from scratch. Tools like XML Sitemaps will quickly generate a sitemap, free of charge.
Once you have your sitemap, you can complete Google Search Console sitemap submission. Go to your account, click on the “Sitemaps” tab, and enter your URL into the “add a new sitemap” section.
That’s pretty much it! Once you sign in, verify your website, and complete Google Search Console sitemap submission, the service will start providing data. Note it can take anywhere from a few days to a few weeks for your account to show all of your pages.
How to Set Up Google Search Console — Enlist Professional Help
As you can see from our walkthrough above, the setup process is relatively straightforward.
However, it’s natural to want professional help. Our Google Search Console SEO experts are eager to partner with you! We take care of everything so that you don’t have to worry about verification, XML sitemaps, or anything of the sort.
Plus, thanks to our meticulous work, you’ll get a solid Google Search Console SEO foundation from the get-go. Strong roots will ensure your pages get the rankings they deserve.
Ready to get started? Reach out to one of our experts to learn more!
How to Use Google Search Console
While Google Search Console setup is easy, using the platform is another story. Navigating the platform should come easy, but it’s analyzing what the data is telling you that’s the tricky part.
As a result, it’s hard to give you a step-by-step walkthrough of how to use Google Search Console.
What we can do, however, is give you a comprehensive overview of the platform. By understanding what data is accessible and how to use basic features, you can tap into the power of GSC.
Therefore, the rest of this guide will focus on teaching you how to use Google Search Console. Read on for the best tips and tricks!
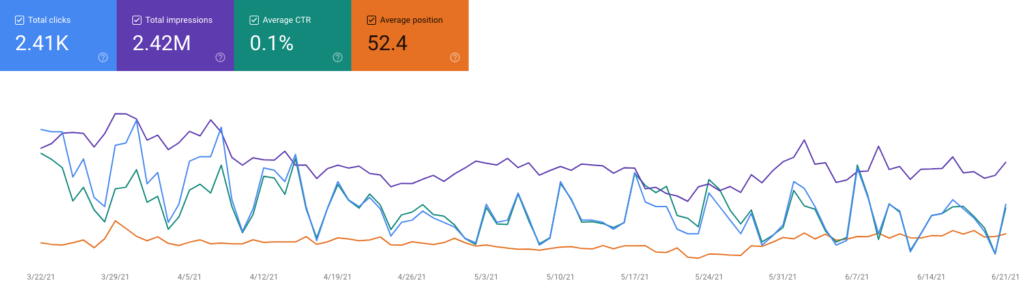
Understanding the Performance Tab
For many SEO professionals, the performance tab is their go-to section. They check the data here every day to see which Google Search Console keywords and pages are doing well and which need more attention.
In the past, GSC only presented data from the past 90 days. Today, however, users can see stats going as far back as 16 months.
Any information spanning 16 months can be overwhelming. It gets even more confusing if you’re not familiar with terms like clicks, impressions, and CTRs.
Below, we break down this tab’s four main metrics. By understanding these terms, you’ll know what GSC is telling you about your website’s performance.
1. Clicks
Clicks are a simple yet powerful metric. At its core, the number of clicks your pages get is directly correlated from your ranking. For example, a page in the top 5 of search results will get far more clicks than one at the top of the second page.
Clicks are also valuable because they indicate the performance of your meta titles and meta descriptions. Compelling copy will convince your users to check out your page, learn more, or even buy a product. If the copy doesn’t grab your audience’s attention and inspire them to take action, you won’t get as many clicks.
When you analyze your clicks, it’s important to realize that many factors could affect this metric. For instance, let’s say you conclude that your low number of clicks is due to poorly written meta titles and descriptions.
However, the subpar performance may have less to do with the copy and more to do with your pages not coming across the right people. You may be optimizing for the wrong keywords or targeting the wrong audience.
Whatever the case may be, you will need to tweak your campaigns and analyze the new results accordingly.
2. Impressions
When Google deems your page relevant to a user’s query, it will display your page in the search results. Every time your page displays to a user, it earns an impression.
Impressions are essential to your campaign’s success. Not only do they create brand awareness, but they also lead to clicks that could ultimately turn into conversions.
Considering how many pages are vying for impressions on Google, you need to make sure your SEO is up to par to show the search engine that you’re worthy. You can earn its trust by tightening up your SEO efforts.
When you check the impressions tab, be sure to check which Google Search Console keywords are triggering impressions. This information is crucial to know if Google perceives your pages the way you want it to. You can even filter by pages and see which particular keywords a page is ranking for by clicking on that particular page within the table.
If your pages aren’t optimized, you won’t get impressions for keywords you want to rank for. Just as bad, you’ll get impressions for keywords you don’t want to rank for.
The solution? Rework your content around your target keywords and include a good internal linking strategy.
3. Average CTR
Having lots of impressions is a good sign. It means that Google is showing your content to people.
However, the number of impressions only tells part of the story. A more comprehensive metric is average CTR.
CTR stands for click-through rate. As the name suggests, it tells you what percentage of users “click-through” to your site. Essentially, it’s a ratio of clicks that results from impressions.
Seeing as impressions without clicks won’t do you much good, you want your average CTR to be as high as possible.
If you have a poor CTR, it can be the result of many factors. Perhaps you are ranking for keywords that aren’t relevant to your target audience. Or, maybe your competitors are stealing traffic by outperforming you. This can also come back to meta copy like we alluded to earlier.
4. Average Position
Position is, well, the average position of your page within the Google search results. Rankings fluctuate and your one page can rank for many keywords in different positions which is why average position may be a more realistic metric than just your current position that you can pull from something like Semrush.
If you aren’t seeing a keyword that is important to you or that you are targeting show up, that likely means you aren’t relevant for it in Google’s eyes. You’ll need to go back to the drawing board to see how you can attack that keyword.
Understanding the Coverage Tab
The Coverage tab is a perfect overview of your website. It displays all of your indexed pages and pages that aren’t on your sitemap.
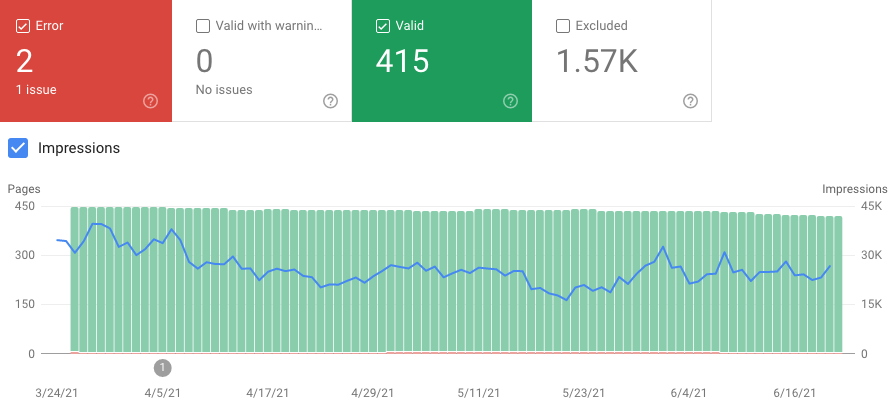
Valid URLs
When you take a look at this report, it should list most of your URLs as “valid.” This status means that the page is indexed and recognized by Google’s crawlers.
Some pages may say “valid with warnings.” This status may refer to your page being indexed despite having an error. Once you address the problem, make sure to click “Validate Fix” so that GSC can take another look, so it doesn’t come back to hurt you later on.
Excluded
Stepping away from valid pages, there are also “excluded” pages. These pages contain rules that prevent Google from indexing them at all. Rules may include anything from noindex tags or being blocked within your robot.txt files, to having a canonical tag referencing a different URL.
If pages you want to be indexed are marked as excluded, you should be concerned. Leaving the “noindex” rules in place will prevent Google from putting those pages in search results.
However, excluded pages aren’t always a problem. Some web developers will purposefully exclude pages with duplicate or thin content. When you exclude these pages that can potentially harm SEO, your rankings may improve.
Monitor this to ensure a page that is important to your site isn’t excluded.
Errors
Unlike excluded pages, pages with errors are almost always a bad sign. They indicate that there is something wrong that’s preventing Google from indexing your pages.
If you want the crawlers to recognize your pages, you must address the errors. Common examples of crawl errors are as follows:
Server Errors
Server errors are common when your pages are getting too much traffic. They may result when you post a link to a social media account with a large following, release a new product, etc. Whatever the case may be, you should determine if there is an underlying issue with the timeout or connection.
404 Errors
404 errors are the most common types of errors and usually occur when you unpublish or delete a page. They don’t tend to affect your rankings, but they can impact your links and crawl budget.
If you have lots of 404 errors, you should implement a 301 redirect and remove the internal link from your site. Let’s illustrate a 301 redirect with a simple metaphor.
Pretend you’re moving to a new city. If you want to keep receiving your magazine subscription, you’ll need to send in your new address. Otherwise, the new owner of your old home will get a bunch of free magazines.
A 301 redirect is similar to submitting your new address. When users try to click on an old URL of yours, the 301 redirect will take them to the page’s new permanent location.
Using 301 redirects to eliminate 404 errors is crucial for creating a good user experience. Remember that no one wants to come across these pesky warnings when they’re trying to visit your site. It’s like hitting a dead end on a roadway.
Soft 404 Errors
Note that soft 404 errors don’t go to the server. Instead, they are just labels that Google adds to a page.
However, that doesn’t mean that you shouldn’t address soft 404 errors. These issues can indirectly affect your rankings and make it difficult for users to find your pages.
Like with 404 errors, you can use a 301 redirect to fix soft 404 errors. They may result from many instances, such as the page doesn’t have much content or too closely resembles your other pages.
Another reason you might get hit with a soft 404 error? Your page features a product that is out of stock or features a “no longer available” message. The crawlers can recognize these elements and determine that the page is irrelevant.
Additionally, soft 404 errors may result from linking errors or slow loading speeds.
DNS Errors
When you access Google Search Console and view your coverage report, you may also notice DNS errors.
DNS stands for (Domain Name System), meaning DNS errors have to do with your server host (BlueHost, Godaddy, etc.). There is very little you can do to address these kinds of issues. So, if you notice DNS errors or hear complaints from your users, you should contact your hosting provider right away. If it’s something that struggles to get resolved, consider switching hosting providers.
How to Use the URL Inspection Tool
The URL inspection tool is a convenient feature of Google Search Console. It lets you diagnose problems with your website’s SEO by giving insights into what data Google has available on the indexability and accessibility of individual URLs.
This tool also lets you test URLs in live time and specializes in inspecting the actual web pages. It doesn’t inspect other types of files like videos, images, and PDFs.
Where Can I Find the URL Inspection Tool?
Before you start using the URL inspection tool, you should familiarize yourself with its location. The URL inspection tool is infamous for its ease of usability, but it’s also easy to find. You can find it in several spots:
• The search bar at the top of your dashboard
• The sidebar located on the navigation panel
• Anywhere you see a small magnifying glass located next to a URL
The ability to access the URL inspection tool from essentially anywhere is huge. The convenience lets you test URLs live without needing to navigate to a new web page altogether. You can test any of your website’s URLs whenever the need strikes with very little hassle.
Using the URL Inspection Tool
Now that you know how to find the URL Inspection Tool, it’s time to learn how to use it.
You can start by copying the URL you’d like to inspect to your clipboard. Paste the entire URL into the “inspect search” field at the top of your GSC dashboard. Next, press “enter” on your keyboard or click the little magnifying glass on the left-hand side. This action will commence data retrieval from Google’s index.
Note: Remember, you can only use this tool for web pages and not other types of media. It’ll also only show results for web searches, as it was designed for use by individuals interested in improving their website’s SEO.
Within seconds, GSC will take you to a page that displays the results of the inspection. The results page is divided into three sections, all of which display information from Google’s most recent crawl (or crawl attempt). None of this data will reflect results from a live URL test.
The most important portion to consider is the top one. This section will tell you whether your URL can appear in Google search results. You will receive one of the following notifications:
“URL is an alternate version”
This status means that your URL is an alternative desktop or mobile version of a URL. For example, if your website is desktop-first, and you entered the mobile URL, you’ll receive this notification. You won’t need to take any action when you receive this status.
“URL is not on Google (Indexing Errors)”
This status indicates indexing errors. To remediate the issue, you’ll need to research why Google won’t crawl and index your URL. The best way to do this is to ensure that you’ve granted Google unrestricted access to your URL. From there, you can use the test live URL feature to verify its functionality.
“URL is not on Google (with no accompanying message)”
This straightforward message means no errors are present, but Google doesn’t recognize your page. Why is this the case? Most likely, Google deemed your page as irrelevant to index. It might have had a noindex directive or was disallowed in your robots.txt file.
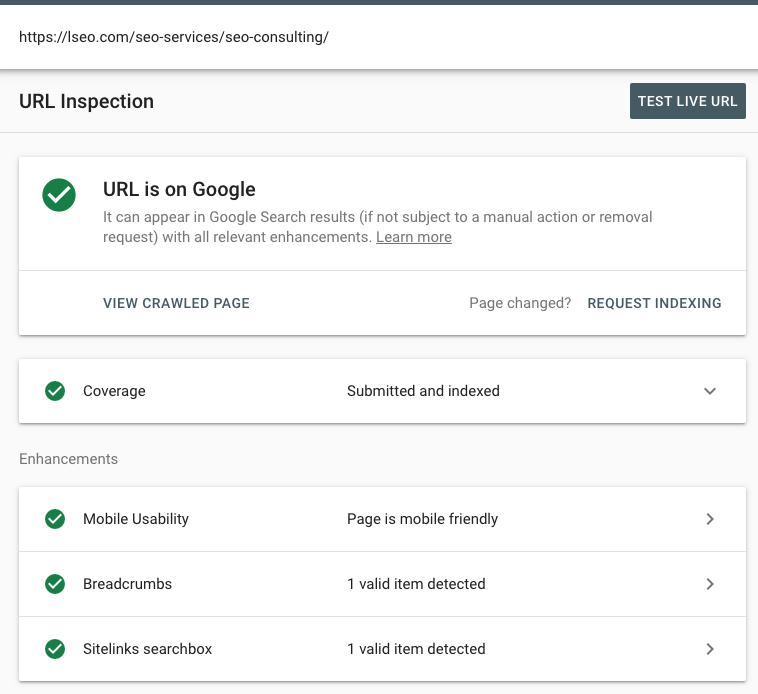
“URL is on Google (but has issues)”
This message means your page shows up on Google, but the search engine has pinpointed problems with its enhancements. Depending on your sitemap, the enhancements may display partially or not at all. If the messages only display as “warnings” and not actual problems, they won’t impact your page’s visibility.
“URL is on Google”
This status is any website owner’s sweet spot. It means that your URL can appear in Google search results. Essentially, everything is fine with your URL. If you aren’t achieving the rankings you desire, you can add more internal links, tweak your content, and acquire backlinks to boost its performance. However, if you see this status after using the URL inspection tool, you’re in a favorable position.
What Are the Other Two Sections of the URL Inspection Tool?
The other two sections of the URL inspection tool are also very important when improving your website’s SEO.
Going in order, we’ll start with the next section you’ll see: the Coverage section. This section tells you:
• Where the page was discovered (this location could be on a referring page or sitemap).
• Which user agent discovered the crawl.
• When the last crawl took place.
• Whether the Google web index includes the page.
For example, this step might reveal that a specific page is currently a part of your XML sitemap but is marked as “no index.”
The final section is called the Enhancements section. This section contains details on structured data and AMP and mobile usability errors. This section will display any necessary error messages detailing the incorrect or missing values.
After reviewing the three sections of the URL Inspection tool, you’ll have three tasks on your to-do list:
1. Click the “Test Live URL” button.
This action will allow you to see if Google can index a particular page. You should always run a live test, as one can reveal that an issue is still present even after you thought you fixed it on your website. Selecting this button is the only way to see a live rendered version of your web pages by Google.
2. Click the “Request Indexing” button.
Once you perform this task, Google will re-index your page. This action is essential if you made any changes to your web page. You’d need to re-index your page even if you made a small change, such as fixing a structured data error.
3. Click the “View Crawled Page” button.
Are you interested in reading more information about the page you’re testing? Upon clicking the “View Crawled Page” button, you’ll see the retrieved HTML, information about the HTTP response, and all the page resources available.
Usability Report for Google Search Console
One of the perks of Google Search Console is that it lets you understand the user experience your website offers on mobile devices. Two of its most convenient features allow you to do this: the page experience section and the usability report.
Below, you can learn more about these features. But, before we discuss them in detail, we’d like you to understand why mobile optimization is so important for any business’s website, no matter your company’s size, industry, or the number of years in operation.
The Importance of Mobile Optimization
If you’ve been in the SEO realm for any amount of time, you’ve probably heard the following advice regurgitated endlessly: you can’t ignore mobile optimization. And we don’t mind repeating it once again for you.
Keep in mind that we live in a fast-paced world. People of all ages, professions, and geographic origins prefer to search for things online using their smartphones. One study found that in 2019, Internet users performed over half of all organic searches on a mobile device.
If you don’t take the initiative and check how your website performs on mobile devices, you’re doing your business a disservice. You and your staff could be leaving behind more than half of your customer base.
Nothing’s more frustrating than a slow website when you’re trying to find a solution to your problem(s) on the go. Put yourself in the consumer’s shoes — would you want to wait dozens of seconds for all of a website’s elements to load?
Chances are, the answer is no. According to a study by Marketing Dive, more than half of mobile users will abandon a website if it takes longer than three seconds to load.
Even if your website shows up near the top of the search engine results page, you can quickly lose this advantage if your page load speed is too slow. Mobile users will return to the SERP and scroll further down, hoping to find a site that can better cater to their short attention spans.
The Mobile-Friendly Test Tool
Now that you understand the importance of mobile optimization, we’d like to introduce you to the first beneficial resource: the mobile-friendly test tool.
Some of the most common problems the Mobile-Friendly test tool will detect include:
Small Font Sizes
Small font sizes are challenging to read on a tiny screen. Internet users won’t want to squint or pull out their magnifying glasses to absorb the content that’s on your page.
The Use of Adobe Flash
Most mobile devices don’t support Adobe Flash. As a result, your inclusion of this software could present errors on a user’s screen. Instead, you should consider ditching plug-ins and opting for more widely supported web technologies like HTML5.
Your Content is Wider than Your Screen
Have you ever landed on a mobile website only to find that half the content is cut off? This is the experience you’ll get when the content is wider than the screen.
Vertical scrolling is fine and even necessary for many websites. Some highly experienced web developers can get away with implementing horizontal scrolling, but it can mess with your site’s mobile friendliness if you’re not careful. Avoid jeopardizing your website by ensuring your pages use relative width and position values for all CSS elements. This way, your visitors won’t have to resort to cumbersome horizontal scrolling.
Clickable Elements Overlap Each Other
All your landing pages likely have calls-to-action, which are messages that compel users to take a specific step with your business. You often draw attention to these commands with big, colorful buttons that read “Get in Touch Today!” or “Add to Cart” To reap these buttons’ full potential, they shouldn’t overlap each other. If buttons and navigational links are too close together, a mobile user won’t be able to make the selection they’d like to.
The Mobile Usability Report
There’s no doubt that the mobile-friendly test tool is a quick, accessible way to test how well your website performs on smartphones, tablets, and other mobile devices. However, in our experience, it’s not the most comprehensive.
From our experience, the most all-inclusive way to check the mobile-friendly status of your site is to review the mobile usability report. This report goes more in-depth to the usability problems that visitors experience when they view your site on a mobile device.
Before you can access the mobile usability report, you must first verify that you own the website attached to your Google Search Console account. This step will prevent malicious activity and ensure that you and other account owners are the only ones who can review this information. Once you verify your GSC account, the verification will last as long as GSC can confirm the validity of your verification token.
Once you secure verification, you are good to go. The best part? GSC begins data collection even before the verification process is complete, ensuring you’ll have a full list of final results.
GSC understands that most websites (especially those of smaller businesses) can’t be perfect in every sense of the word. A few minor mobile usability issues won’t affect your ranking significantly, if at all. It’s more-so to enhance the user experience of your site and not have users bouncing which we know can negatively effect your ranking.
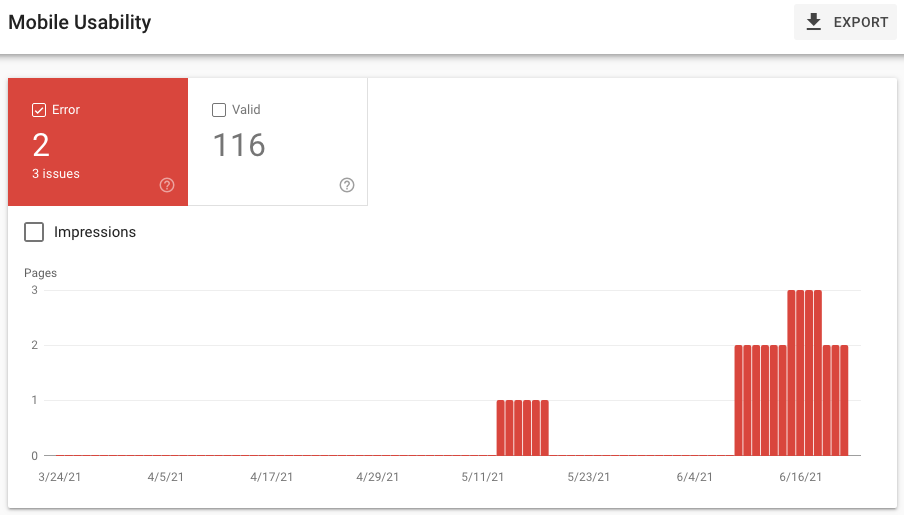
The top level of your mobile usability report will highlight all of your website’s pages that have more than an acceptable level of mobile usability issues.
You can click on an issue to read the details and view a sample list of all the pages affected by that particular problem. From there, you can read the information on how to remediate the issue and alert Google about the fixes you make.
The tables included with each mobile usability report will display up to 1,000 rows of data. Keep in mind that some issues might not show up because your website contains more than 1,000 pages or an issue is quite new. Therefore, it’s essential to check back frequently so that you can notify yourself of new errors and address them accordingly.
How to Use the Removals Tool in Google Search Console
The removals tool can be a bit complicated and also dangerous to your site, but it’s worth learning how to use. Here’s an overview of what you can do with it:
Temporary Removals
If you want to hide something from the crawlers temporarily, you should use Temporary Removals. This feature is ideal for managing thin or duplicate content.
Before you submit URLs for removal, be sure to complete the following steps for each page:
• Add a noindex meta tag
• Disallow in the robots.txt file
• Insert the rel=canonical tag
Note that the temporary removal will take about a day to set in. Once it does, it will be active for six months.
If you want to cancel a temporary removal before the six months are up, simply access Google Search Console and click “Cancel request.”
Outdated Content
When browsing search results, users can submit removal requests to Google. These requests indicate if they feel the content is outdated.
When you access Google Search Console, you can view removal requests for your properties. At any given time, you can view these requests from the past six months.
Most SEO experts don’t give much attention to the Outdated Content feature. Why? Well, it’s not a big concern, as users can’t force Google to remove your pages from search results. Instead, the requests are just recommendations for you.
However, it can be worth looking at these requests. If you notice many users requesting the removal of certain pages, you should review them to determine their relevance. If they are outdated, removing them can improve the user experience.
SafeSearch Filtering
In addition to outdated content, users can report content that they classify as “adult” content. Adult content usually includes pornographic materials, but it can also encompass anything one might deem inappropriate or offensive.
If a user flags your content as adult content, Google will review it and determine if it warrants an adult content label.
We highly recommend keeping an eye on the SafeSearch Filtering section. Unfortunately, the feature isn’t perfect, meaning it might flag pages that don’t contain adult content.
How to Use Google Search Console When You Make Edits
When you own a site, it’s only natural to make edits. You might need to update your hours of operation, team members, events, etc.
It’s also common to publish new blog posts, videos, pages, products — you name it. The Internet is not a place to stay stagnant.
As you start making changes, you might wonder if you need to resubmit your sitemap. After all, won’t Google need an update on all of your pages?
This logic is valid, but it may not be necessary to resubmit your sitemap as long as it’s dynamic.
To make the process faster, make sure you maintain the logical structure of your website. For example, pages should be in a hierarchy and contain the appropriate internal links.
When to Resubmit Your Sitemap
While resubmitting your sitemap isn’t necessary, it can help Google index your pages faster.
Resubmission will only be necessary when you make big changes to your site, like adding a new section that requires its own sitemap. Notable edits include adding lots of pages, changing lots of URLs during redevelopment, etc.
To resubmit, all you have to do is open the sitemaps section, click resubmit, and paste the URL.
How to Add User to Google Search Console
When you complete Google Search Console verification, you verify yourself as the property owner. Verification ensures that unauthorized users cannot access your account.
However, you may need other people to access Google Search Console from your account. Additional users can include members of your company or a marketing agency. So, how do you add users to Google Search Console?
Whoever you need to add, you can do so by clicking on the property’s settings. Then, click “users & permissions” and enter their email. Make sure that there is a Google account associated with that email.
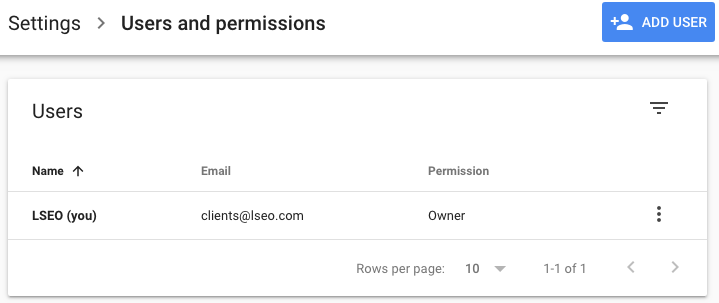
Note that you’ll have to designate a permission level for the user. It’s important to choose the one that gives the access you want the user to have. Here’s an overview of each permission level:
Full User
Full users can view all of your data and can perform some actions.
Restricted User
If someone is a restricted user, they can’t perform most actions. However, they’ll be able to view most of your data.
Associate
Associates don’t have direct access to your data or account. However, you can make certain data viewable to them. You can also permit them to perform certain actions.
If you need to designate a new user as an owner, you cannot do it directly through your account. Instead, they will have to complete Google Search Console verification by creating a token through their account. Then, by uploading an HTML file or linking their Google Analytics account, they will become a property owner.
Should you ever need to change a user’s permissions, simply find their name and choose a different permission level. Note that you must be a verified owner to change permissions.
How to Delete Users From Google Search Console
When an employee leaves your company, or you stop working with a marketing agency, you’ll have to delete users from your account.
You can delete a full user, restricted user, or associate by going to “users & permissions” in settings. Then, find the user you want to delete and click “remove access.” The change takes place immediately.
If you need to delete an owner, go to “users & permissions” and click “manage property owners.” You must delete all of their verification tokens (HTML files, analytics tracking code, etc.). Then, click “un-verify” next to their name.
Remember that the un-verify request will only be successful if you delete all the user’s verification tokens.
How to Delete an Unrecognized Owner
If you happen to notice that your account lists an unauthorized user as an owner, you may have been hacked.
Getting hacked can be disastrous for your account. Of course, it’s not ideal as others will have access to your sensitive data. It can even display an error when users try to visit your pages and prevent them from entering your site.
Your first instinct should be to remove the user’s verification tokens and un-verify them. However, the hacker will likely be able to add their token back.
In this situation, the best thing to do is hire a security professional to secure your site.
Contact Our Google Search Console SEO Experts Today
We know we’ve thrown a lot of information at you. But hopefully, this guide will help you optimize Google Search Console SEO. Feel free to bookmark this page as you go about your journey!
If you need additional help, contact our SEO experts today! We’re eager to help you set up your account, offer expert monitoring, and provide recommendations based off the data on a monthly basis.
With our professional services, you’ll enjoy higher rankings while making more time for your business.